

Mapping a process with a swimlane – how to get it right
Erich Pelikan – 19.1.2025
Content:
- Preparation
- Start of the process mapping
- Identify the roles involved
- Questions, questions, questions
- Choosing the right level of detail
- Time information in the swimlane
- Dealing with additional information
- Scheduling
- Conclusion
- Further use of the swimlane
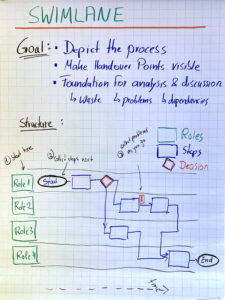
A thorough process analysis is almost always the first step in a Kaizen workshop. And the process function diagram, often called a swimlane for short, is usually the method of choice. But what looks so simple can be quite challenging for a facilitator who is recording a swimlane for the first time. So let’s go through it step by step and look at some tips and tricks that can contribute to a successful process mapping.
1. Preparation
The basic equipment consists of a meeting room with a sufficiently long free wall, brown paper (wrapping paper in large sheets), Post-ITs in different colors and sizes, moderation markers as well as masking tape, crystal tape, glue stick and scissors. In addition, moderation cards (Metaplan cards) in rectangular and round can be helpful, especially for larger process recordings, but are not a must. A flipchart can be helpful for short visualizations or to support discussions.

Before the workshop, the moderator should attach several sheets of brown paper (width before height) to the wall. Recommendation here: leave some space to the right so that you can “extend” if necessary. Align the top edge of the brown paper so that the facilitator can still write at the top. Use masking tape (painter’s tape) to attach the brown paper, but make sure you do an adhesive test beforehand to avoid damaging the wall when removing the masking tape.
This preparation may seem like just a detail, but it saves valuable time in the workshop itself. Of course, the brown paper can also be applied during the break, but it is not uncommon for the moderator to need this time for other things in connection with the workshop (hanging up flip charts, documenting interim results, taking pictures etc.).
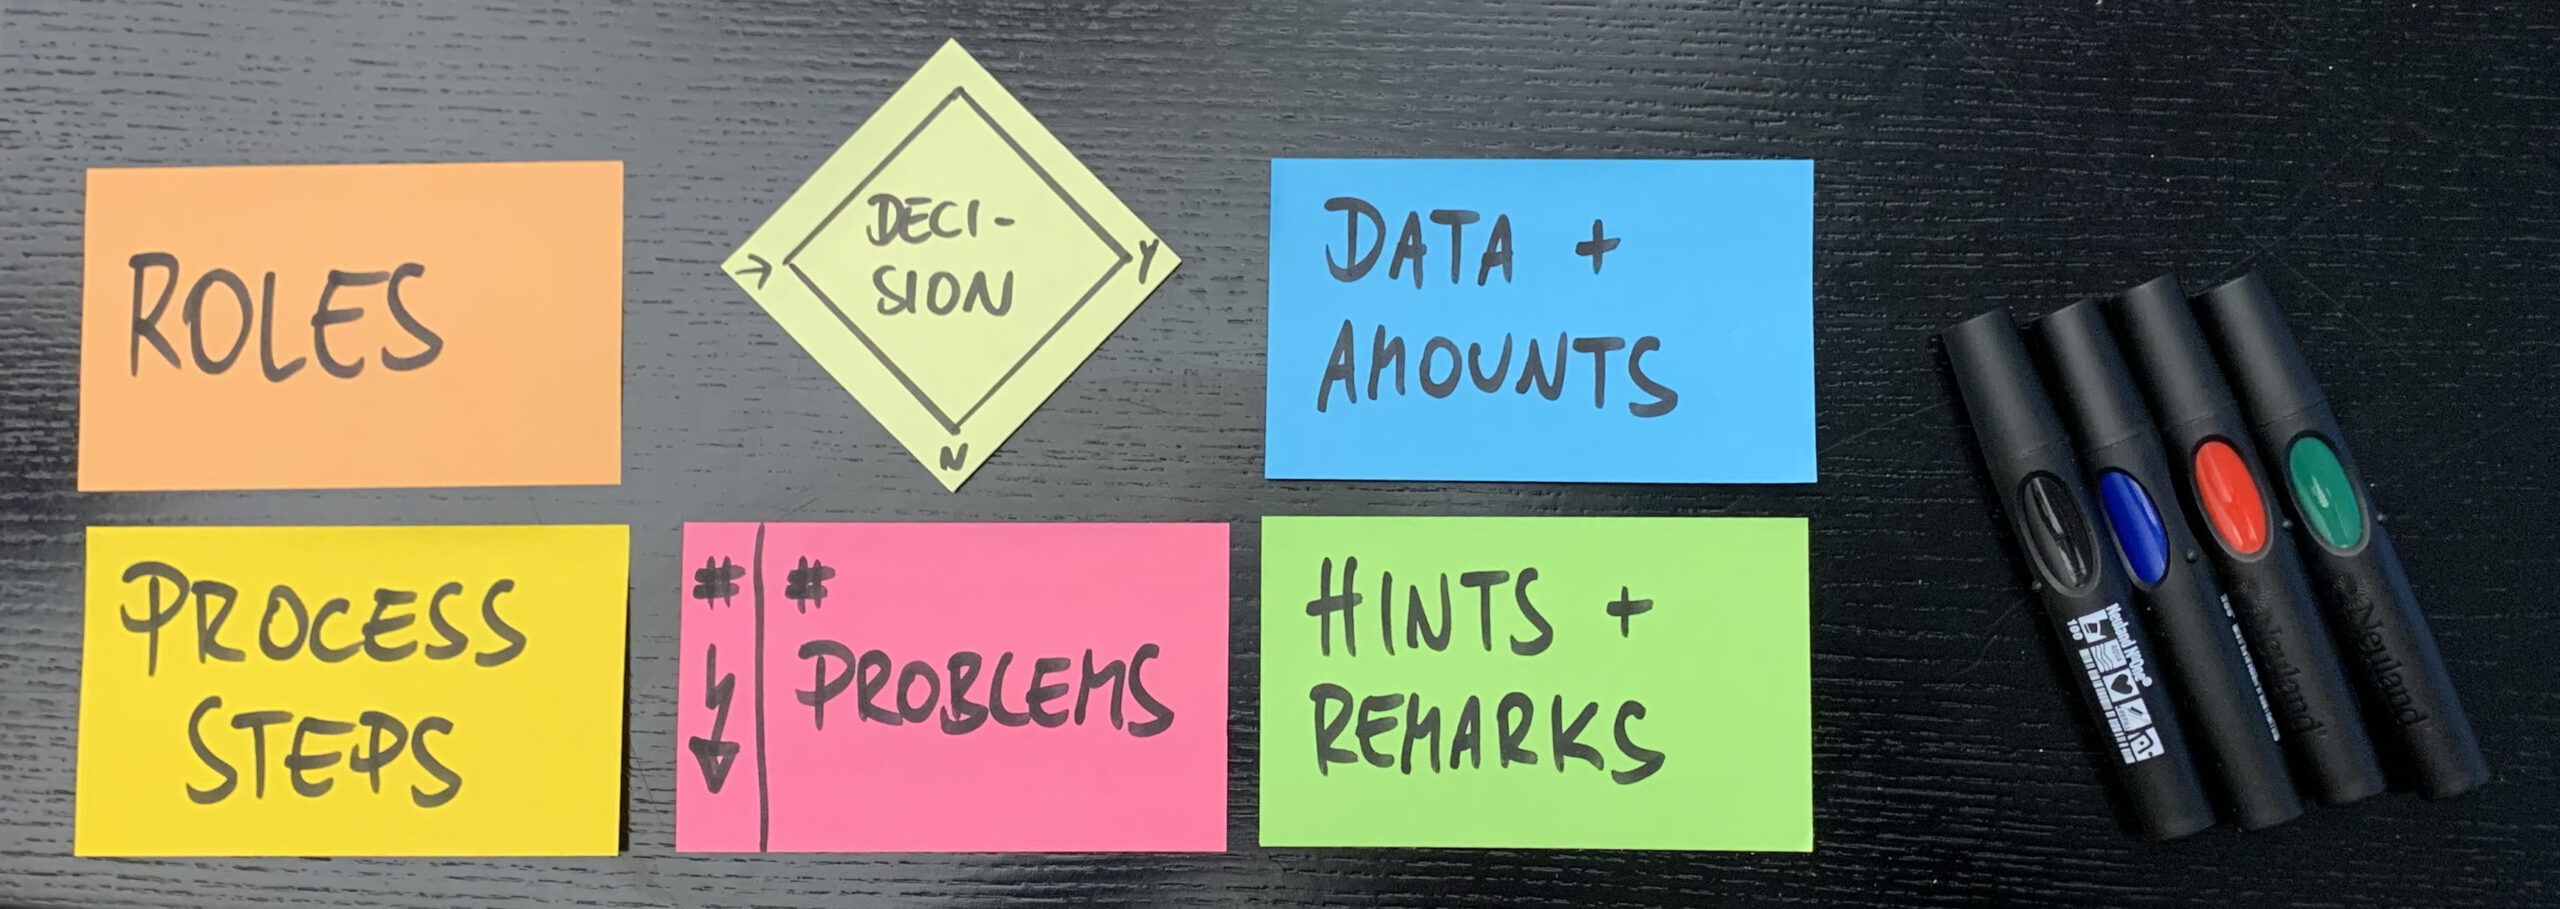
For the Post-ITs, it is helpful to create a color scheme in advance, e.g. green for roles, pink for process steps, blue for decision points, yellow for problems and information that needs to be recorded. It is extremely important for readability that this color assignment is consistently adhered to, which is why care should be taken to ensure that a sufficient number of Post- are available for the process steps.
In a training session, I was asked whether it wouldn’t make sense to draw lines for the swimlanes straight away to make orientation easier. My recommendation is to refrain from doing this until the end of the process mapping, especially if the facilitator does not know the number of roles involved. With Post-ITs, we can adjust distances relatively quickly, but once lines have been drawn on the brown paper, they can no longer be moved. The same applies to connecting lines between process steps – we also draw these as late as possible, as there are always additional aspects (special cases, exceptions) that still need to be included, usually towards the end of the process recording.
An important aspect of personal preparation is to gain an overview of the process and, above all, to match the roles involved with the participants. The aim is to ensure that all parts of the process are represented in the room, so that there are no blind spots when recording the process. This check should already be carried out in the preliminary discussion with the process owner, as well as determining the start and end points of the process.
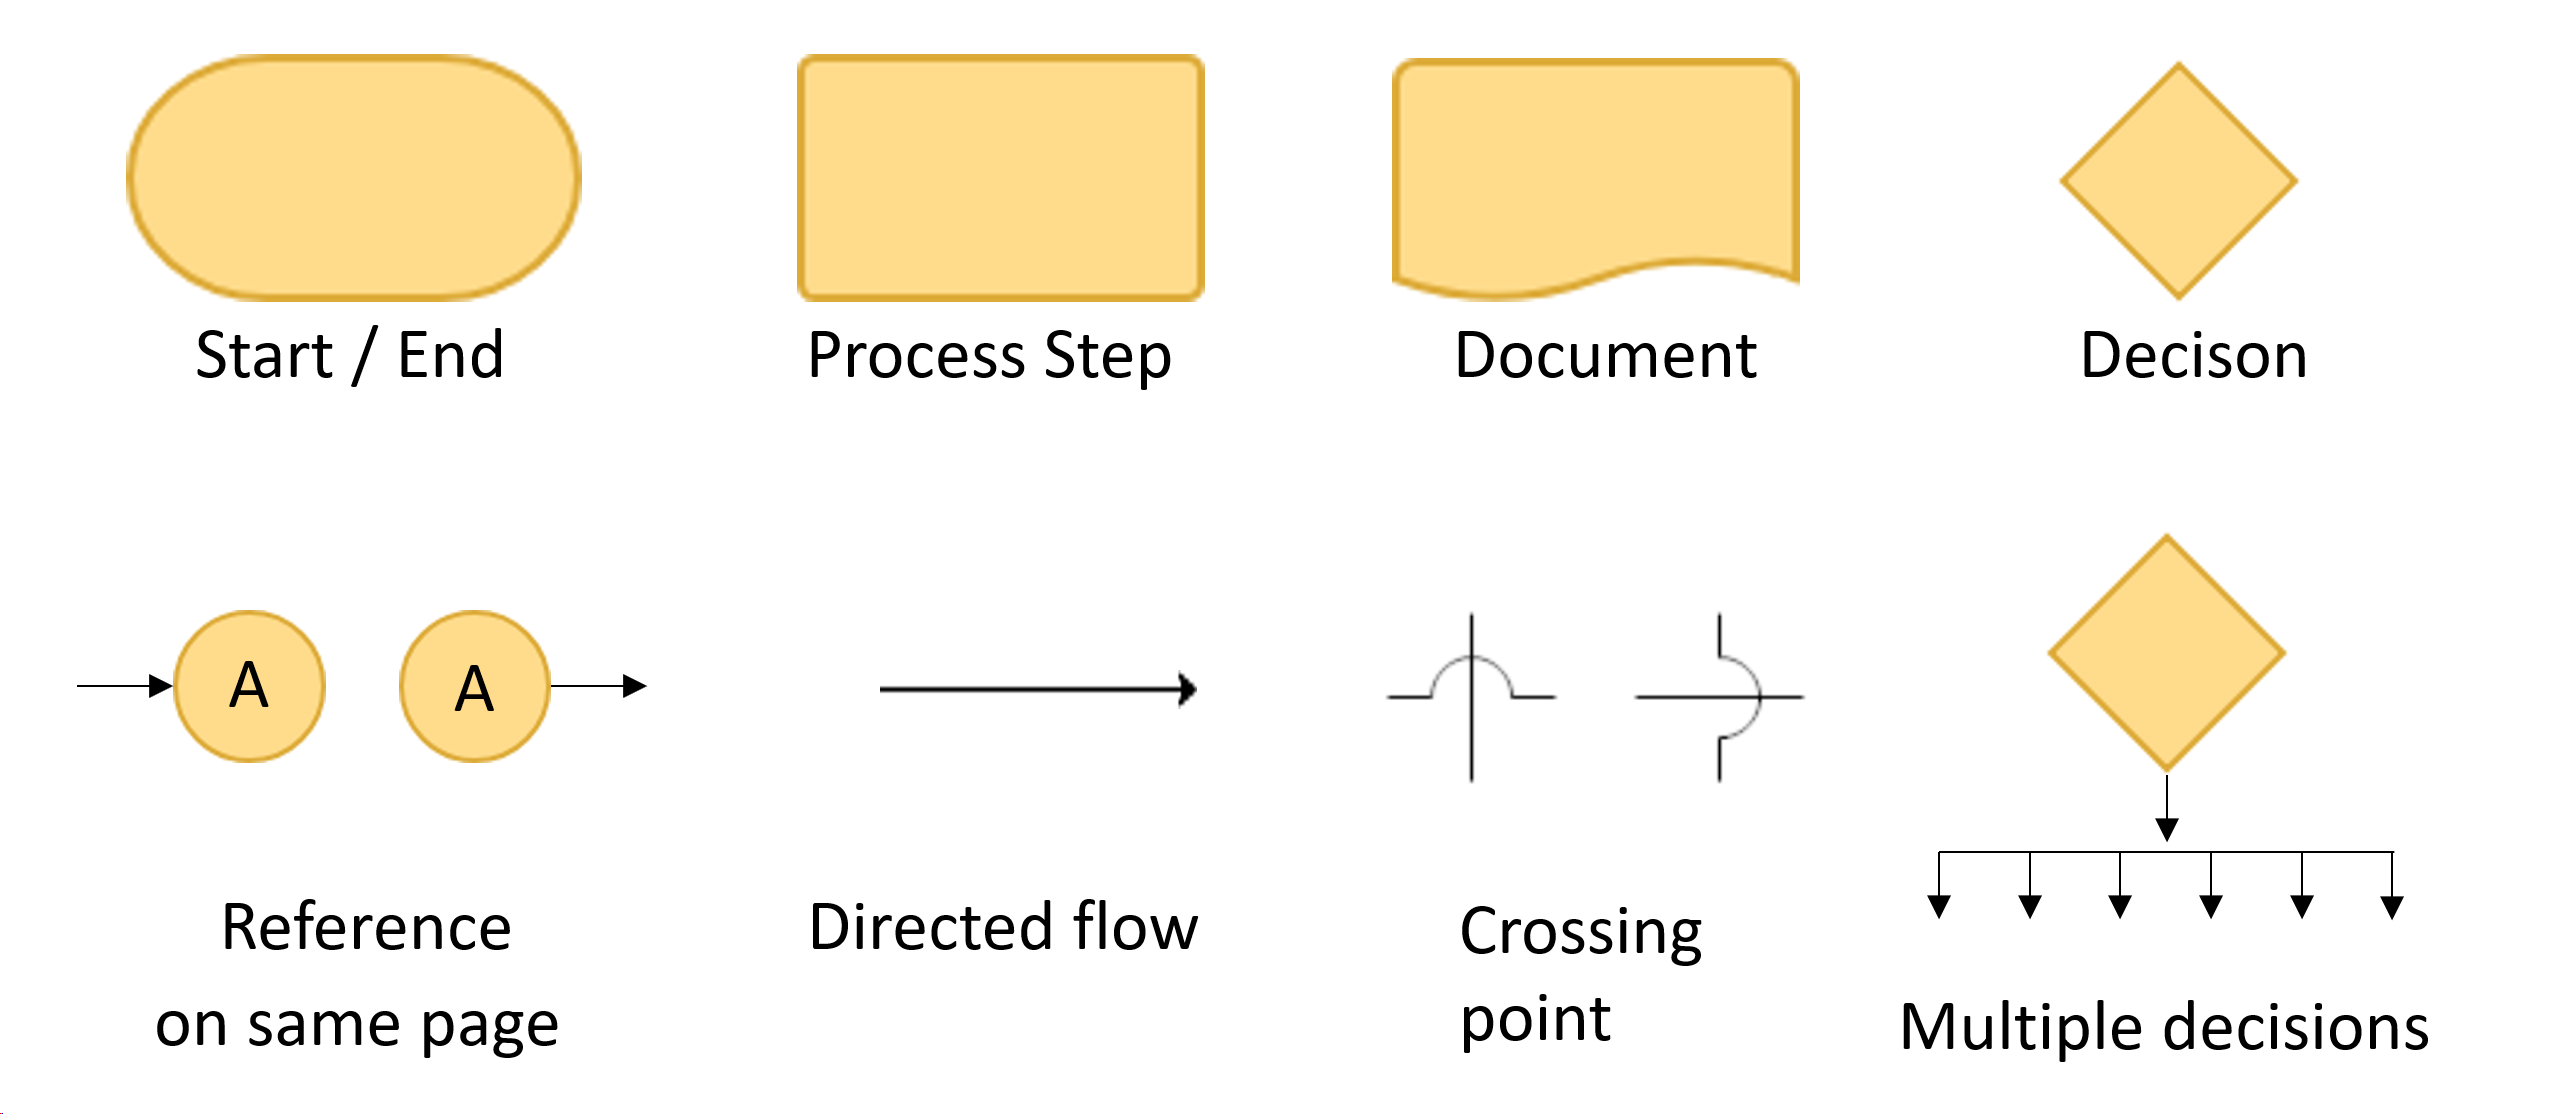
As a further step in personal preparation, it can be useful to recall the common symbols for flow charts, e.g. how decision points or multiple decisions are correctly represented.
2. Start of the process mapping
We cannot necessarily assume that everyone knows the swimlane tool, which is why a brief explanation should be given at the beginning. It is a good idea to summarize the most important points in advance on a flip chart.
The actual work on the swimlane begins with the delimitation of the process (start, end), entering the title at the top center of the brown paper and, if necessary, adding relevant supporting information (volume in a shift, time of the shift, available personnel, date of the process recording, team that carried out the recording, etc.).
3. Identify the roles involved
Next, we ask for the roles involved and collect them in a column on the far left, ideally already sorted according to the order of involvement in the process: early involvement at the top, late involvement in the column of roles at the bottom. The list is often not complete, but can also include roles that are not really involved in the process. We collect them all anyway, but very quickly tie up discussions on whether or not to include a named role, stating that this will be clarified in the course of the process recording. Post-ITs for roles should be the same size as process steps, but should be visually differentiated by a uniform color scheme.
With very large swimlanes (> 4-5 meters), it can be difficult to identify the role responsible for a step (especially without horizontal lines). A tried and tested aid is to copy the roles, i.e. we repeat the role column to make the assignment easier. Please really copy all roles here, even if individual roles no longer have a contribution later in the process. The alternative is to split the process at a logical point and start again with fewer roles.
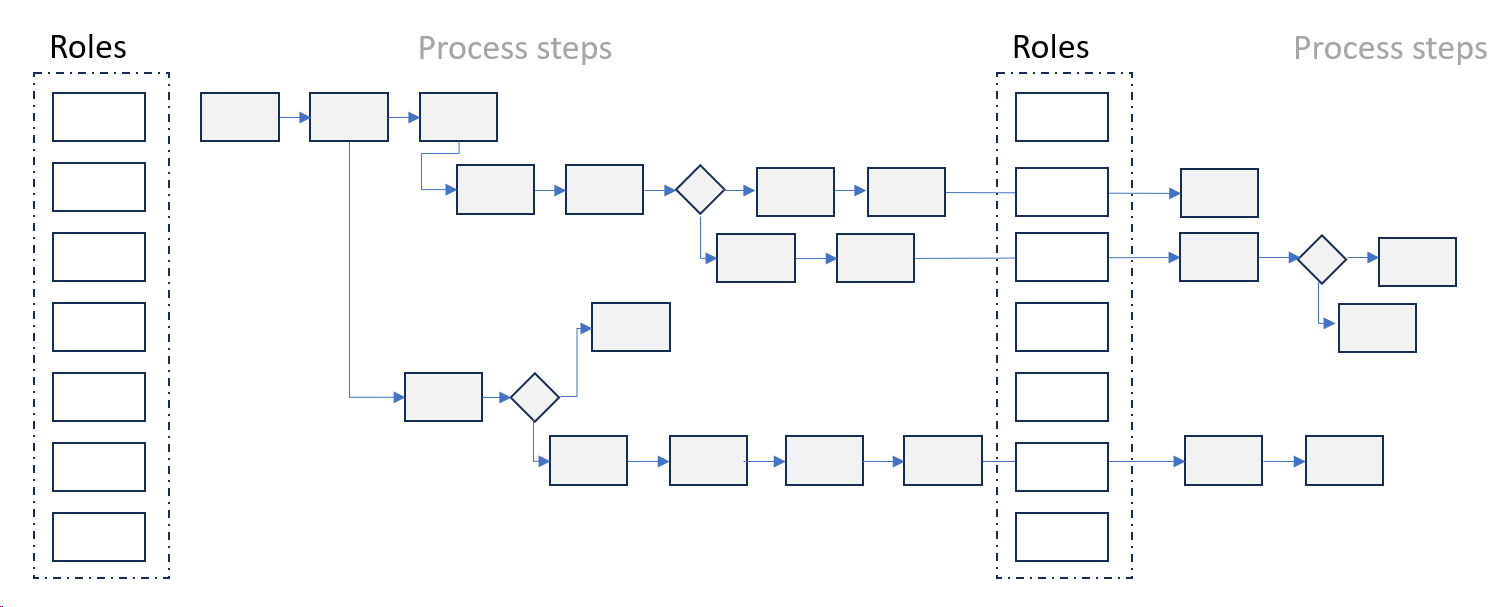
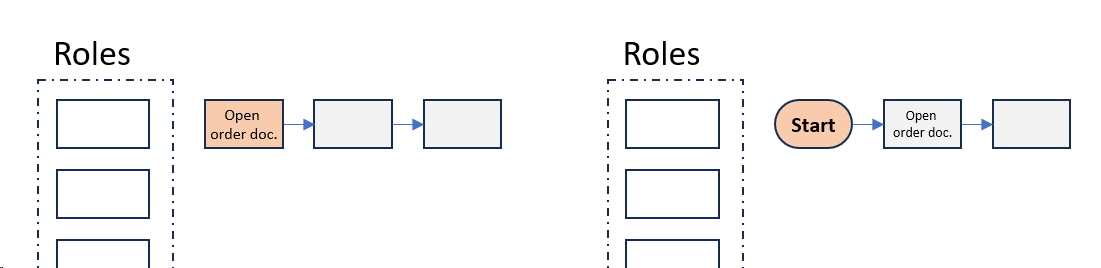
The next step is to identify the starting point or trigger of the process with the team (previously determined with the process owner). Some facilitators present it as the first process step, others prefer an explicit start symbol. However, as all participants in the room follow the development anyway, this detail is of secondary importance. Still it is important to follow the rule of always using at least one verb and one noun for all process steps, e.g. not just “order”, but “create order (in system xy)”.
I often see that less experienced moderators in particular try to write the corresponding Post-IT while holden the stack in their hand due to (wrongly perceived) time pressure, which makes it very difficult to read. There are three solutions here:
- Stick Post-IT in the right place on the brown paper and write there,
- write at a standing desk that you have brought in beforehand,
- outsource the writing to the participants or a helper.
The latter has the advantage that the participants are more involved and virtually take responsibility for the correct presentation of their steps. The instruction to only write on two lines and in block letters on small Post-IT notes increases readability.

4. Questions, questions, questions
As a moderator, it is definitely an advantage not to know the process in detail. Asking questions about processes that are unclear to the moderator, but which are clear and known to all participants, leads to these being questioned by the team. Without these questions, potential may well remain untapped because established processes are simply taken for granted.
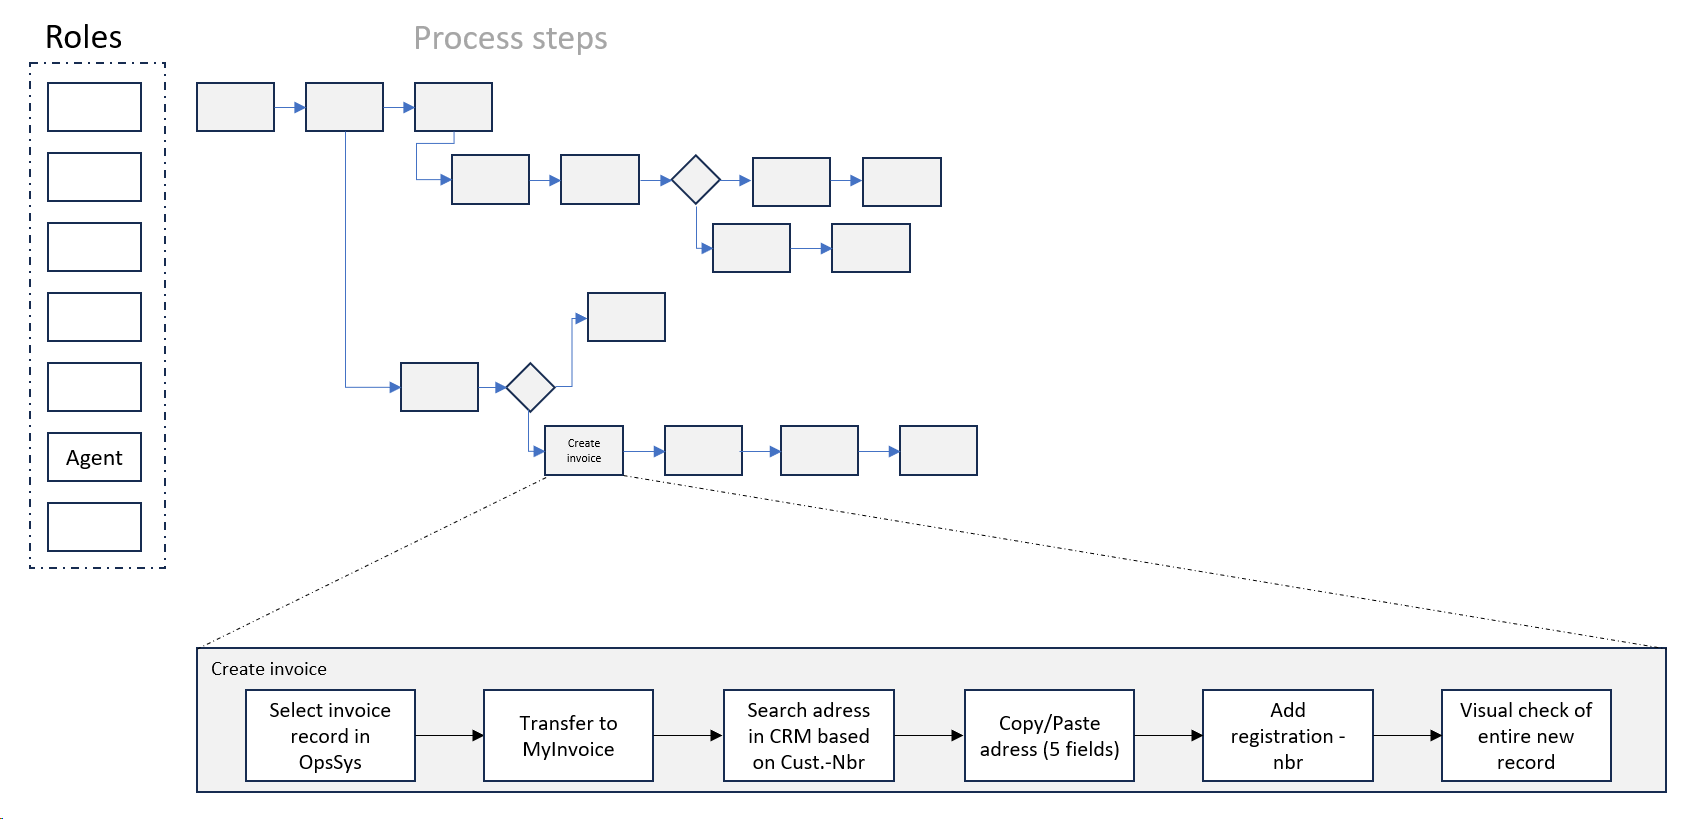
5. Choosing the right level of detail
One of the strengths of the swimlane is that we can theoretically go into as much detail as we like, but this leads to very extensive presentations. Detailed representations are interesting where we want to work out problems. For the majority of a process, however, a level of detail that provides a good overview is usually sufficient. As a moderator, you can open a sub-swimlane with a higher level of detail for a group of steps in which the problems are suspected, thus combining an overview of the overall process with the necessary depth of detail in the problem area.
6. Time information in the swimlane
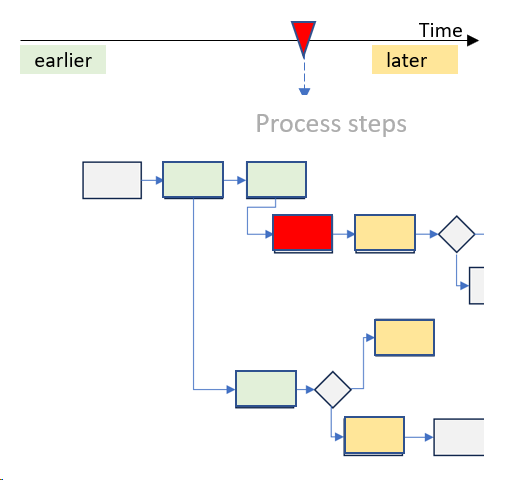
When creating the swimlane, the time axis runs from left to right, i.e. an activity that is on the left relative to a step currently under consideration takes place earlier, while an activity noted on the right takes place later. The imaginary time axis also has no division into intervals and we do not record any information on the cycle time or cycle duration of the steps, unless we need this information due to a specific question. The value stream mapping format is much better suited to documenting more precise data for each process step.
7. Dealing with additional information
As part of the successive process recording, participants will also directly share information about difficulties or problems. As a facilitator, it is important to react to this and give the participants the feeling that they are being heard. Only with very disciplined or practiced teams can we separate the actual process recording from the recording of problems.
The classic tool for this would be the Kaizen burst, which we draw on a Post-IT and fill with the problem description, in order to then add it to the affected process step. This is usually not practicable because
- The readability of the swimlane as a whole suffers massively, especially with a large number of problems in a process,
- problem descriptions usually require so much space that the Kaizen bursts become very large graphically
- A step can contain several problems, which leads to additional problems with the positioning of the Kaizen bursts.
An alternative is to collect the problems on the right-hand side of the swimlane and only place markers on the process steps themselves, e.g. in the form of small numbered flashes.

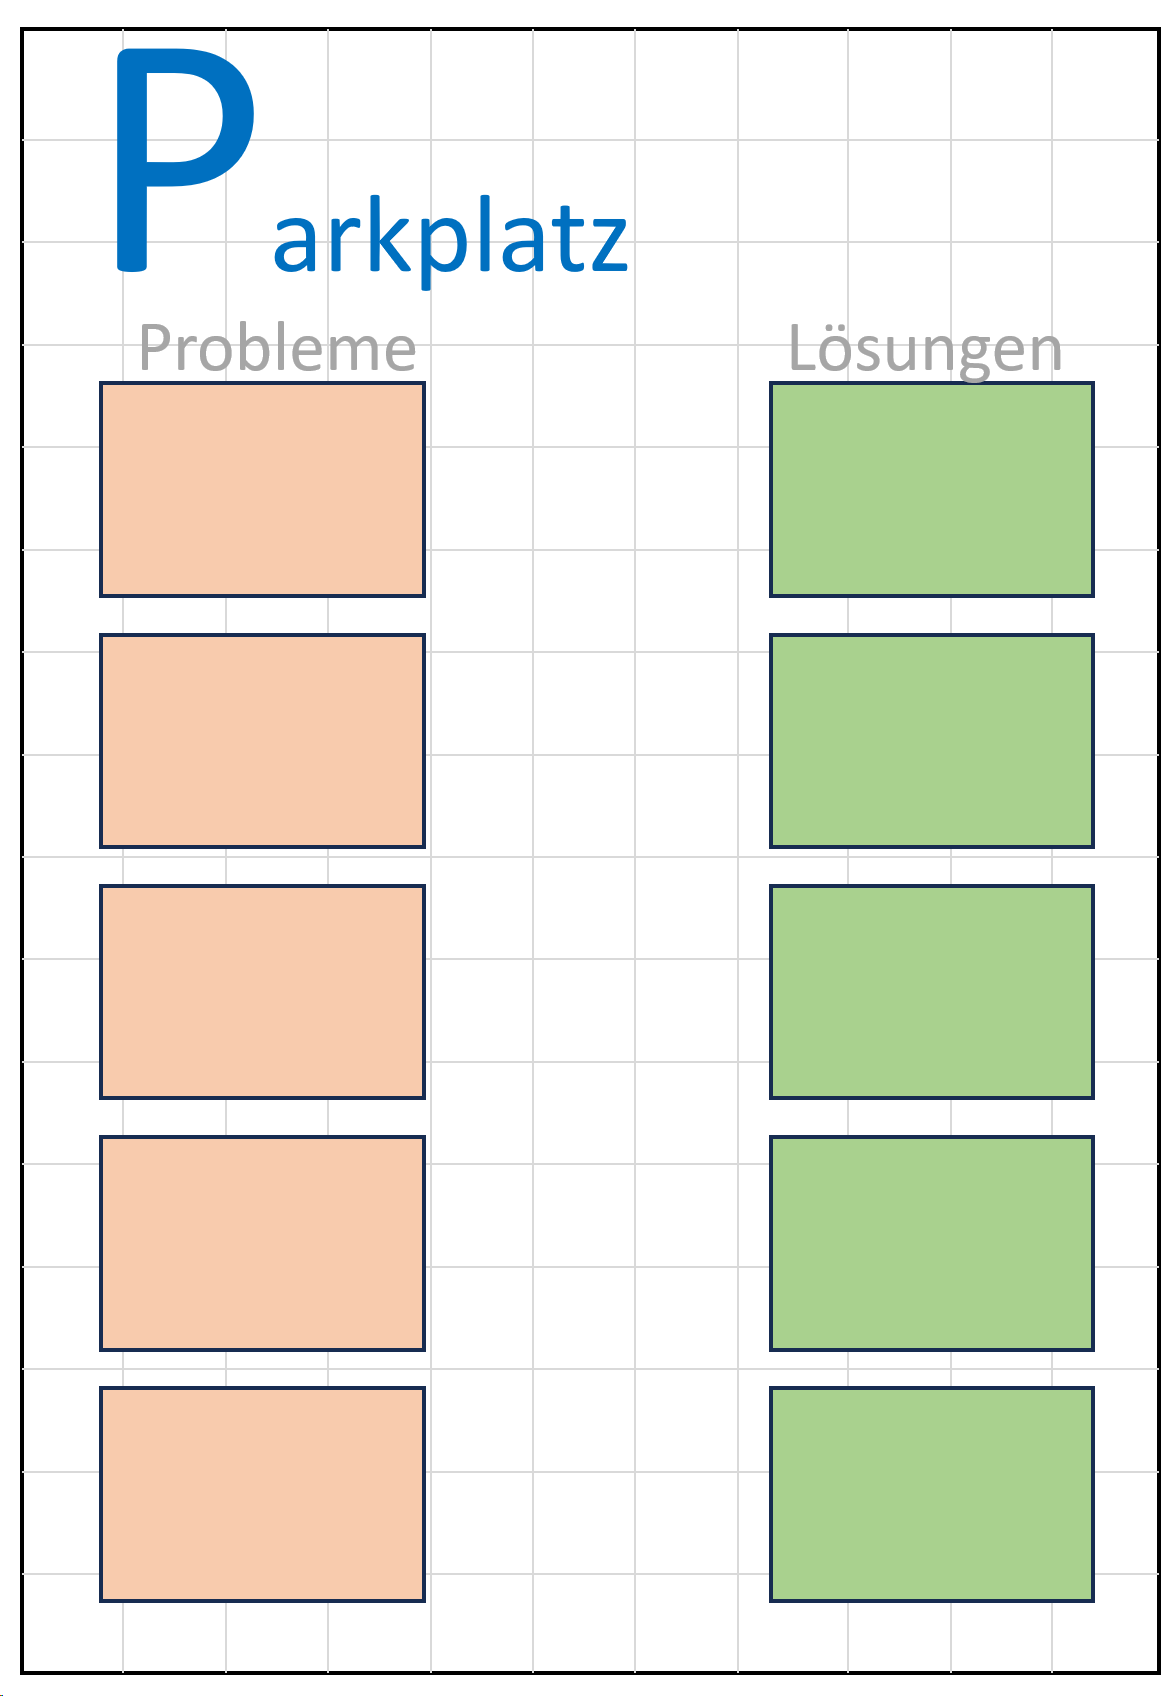
An alternative without direct assignment to process steps is a “parking lot”, which is created on a flipchart before the workshop starts. We collect problems that are reported there on the left and, if necessary, suggestions for solutions on the right. They are then assigned to process steps once the swimlane has been completed. In this way, problems that are expressed at an early stage but are not directly related to the process step that has just been started can be documented and assigned later.
8. Scheduling
Mapping a process using a swimlane can easily take 1.5 to two hours. For teams going through the mapping process for the first time, the start in particular can feel slow. As a facilitator, you would like to make faster progress, but the team needs time to familiarize themselves with the tool and the procedure. Creating time pressure does not help in this phase. New teams only reach the really productive phase after 20-30 minutes from the start of mapping.
9. Conclusion
It is advisable to go through the created swimlane again with the team from start to finish in order to check it for consistency and make minor corrections or sharpening if necessary. We can also add further information that is important for the issue at hand. Once the swimlane has been “approved” by the team, the missing connecting lines can be added to the brown paper. We have thus created a picture of the process that gives all team members an overview of the process flow as well as the interrelationships and forms the basis for the actual process optimization.
10. Further use of the swimlane
After the process recording, the content-related work follows. On the one hand, we can go through the recorded problems step by step, evaluate them according to severity and occurrence and, if necessary, develop possible solutions. A further consideration can be the classification according to added value, necessary and unnecessary waste, in order to then minimize necessary waste and remove unnecessary waste from the process completely. When looking at the interfaces (handover between roles), we can identify media breaks and reasons for delays and at the same time work out important aspects for digitalization.